How Andre Sets Up Eaglesoft to Chart Dentures and Partials


The MOST important thing when it comes to charting Removable Prosthodontics (Dentures and Partials)
Go to Lists>Service Codes and Edit ALL your Dentures and Partials and make sure that
Affected Area is set to Tooth (red box)
In Chart Setup (orange box) the Draw Type is set to "Dentures" (green box)
In the Action Code the status is Missing Tooth (blue box)
Set the Smart Code Setup to Use this code Once for a Range of Teeth (purple box)
Chick the Smart Code for Upper and Lower Teeth. You may have to come back to fill in the codes for upper/lower after both codes are set up. (yellow box)
Repeat this process for the lower then for the Upper and lower partials, Immediate etc.
3) When you chart a FULL Denture Select the ENTIRE arch (1-16 or 17-32)
a. Select the teeth effected by the denture. Tip: You can use the All Upper/All Lower Buttons
b. Select the correct Service Code
c. Change the status to Existing or Proposed.
IMPORTANT: For an Existing Denture there is NO need to chart extracted teeth. The Action Code you selected (Missing Tooth) will extract the teeth in the charting process.
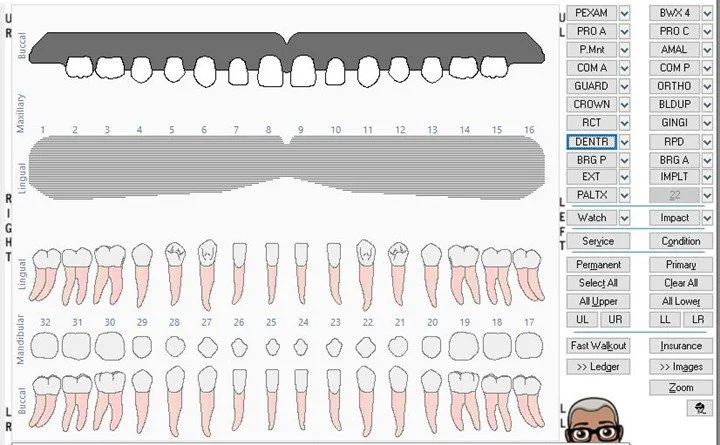
If there is an Upper Denture you do NOT need to extract the teeth. Showing an Existing Upper Denture Extracts all the upper teeth.
I would chart the Existing Denture marking it as Defective (if it's being replaced)…
Ultimately the chart would show the Defective (my Chart Color is hot pink) Dentures in the ledger
Then I would Proposed the new Denture without the need to chart any Extracted teeth.
1) When charting a PARTIAL Denture select ALL the teeth that the Partial replaces. If it replaces Posterior teeth take it all the way back to the 3rds to keep it "clean"
5) Previously charted and Completed Full and Partial Dentures might need to be edited by a User with rights to update the teeth they impact.
When you want to get really fancy you can show clasps, Flexi vs traditional and lots more with my Eaglesoft Clinical Mastery Training.
When Charting an Immediate Denture, Propose the Denture first, then the extractions then when the denture is inserted and the teeth are extracted, you can bring right click on the Denture and bring to the top (example of my draw types below).
Implant retained Dentures are tough in Eaglesoft (with the default draw types). The issue is that an Implant "removes" the tooth and with a Denture, the implant slices through the denture. I've created a BUNCH of these kinds of solutions, but they take a LOT of planning and setup to make work in the real world. (see example) What I ultimately created is an Implant that chart "on top" of the denture (upper) but does not "hide the tooth" (lower)
DISCLAIMER:
This is a resource guide and all decisions on each dental office setup should remain the sole decision of the dentist/owner of the practice. Eaglesoft is a registered trademark of Patterson Dental Company. All other software or products mentioned are the property of their respective owners. Although Andre Shirdan was an employee of Patterson Dental, he is not associated with Eaglesoft or Patterson Dental Company or endorsed by Patterson or any other Company Mentioned in this blog. Although I have gone to great lengths to make sure the information is accurate and useful, I recommend you consult a lawyer if you are seeking legal advice.
In no event will the creator of this document be liable for loss of profits or special, indirect, or consequential damages. No action relating to obligations here under may be brought by the reader or author more than one year after the occurrence of the event giving rise to any cause of action. The writer accepts no legal responsibility for the correctness and completeness of this material and its application to specific factual situations.